Okay, mamas, let’s talk pie. Not just any pie, but the kind of pie that makes your house smell like a grandma’s hug and tastes like pure summer sunshine: a classic, homemade cherry pie! I know, I know, “homemade” can sound intimidating, like you need to churn your own butter and grow your own cherries. But trust me, this recipe is totally doable, even if your baking experience mostly involves boxed cake mix (no judgment here!). This recipe uses simple ingredients, easy-to-follow steps, and a whole lotta love to create a dessert that’s guaranteed to wow. My kids literally dance when they see this coming out of the oven, and even my picky eater husband goes back for seconds. Get ready to become the cherry pie champion of your neighborhood!
Why You’ll Love These
Seriously, this cherry pie is a winner. It’s more than just a dessert; it’s an experience. Here’s why you’ll be making it again and again:
Totally Delicious: The combination of tart cherries, warm spices, and a buttery crust is simply irresistible. It’s a flavor explosion in every bite!
Impress Your Friends (and Family!): Nothing says “I’ve got my life together” like serving a homemade pie. Get ready for the compliments to roll in.
Perfect for Any Occasion: From summer BBQs to cozy holiday gatherings, this cherry pie is always a crowd-pleaser. It’s the ultimate dessert chameleon!
Nostalgia in a Slice: This pie brings back memories of grandma’s kitchen and simpler times. It’s comfort food at its finest.
Freezer-Friendly: Make the pie ahead of time and freeze it for a last-minute dessert emergency. Trust me, you’ll thank yourself later.
Ingredients
Alright, let’s gather our supplies! Here’s everything you’ll need to create this masterpiece:
2 pounds (about 5 cups) pitted tart cherries, fresh or frozen (thawed if frozen)
1 cup cherry juice (reserved from thawing frozen cherries, or supplemented with store-bought)
1/4 cup cornstarch
1/4 cup water
3/4 cup granulated sugar
1/4 teaspoon ground cinnamon
1/8 teaspoon ground ginger
1/2 teaspoon almond extract
1 recipe of your favorite homemade pie crust (or store-bought, we won’t tell!)
1 large egg, beaten with 1 tablespoon water (for egg wash)
2 tablespoons coarse sugar (for sprinkling, optional but recommended!)
Vanilla ice cream for serving (because pie without ice cream is just sad)
How to Make
Here comes the fun part! Don’t be scared – I’m here to guide you every step of the way.
Prepare the Cherry Filling: Place the cherries in a strainer set over a bowl to collect their precious juices. You’ll need 1 cup of juice for the filling. If your cherries aren’t giving up the goods, gently microwave them in 15-second intervals until you have enough. Save any leftover juice for smoothies or cocktails – waste not, want not!
Make the Cornstarch Slurry: In a small bowl, whisk together the cornstarch and water until smooth. This will thicken our filling and prevent a soggy bottom (we’re talking about the pie, people!).
Thicken the Cherry Juice: In a small saucepan, bring the 1 cup of cherry juice to a boil over medium heat. Stir in the sugar and return to a boil. Once the sugar is dissolved, add the cornstarch slurry and stir constantly until the mixture thickens and becomes clear and glossy. This usually takes just a minute or two.
Important: Don’t walk away from the stove during this step! The slurry can thicken quickly and clump up if you’re not paying attention. Trust me, I’ve learned this the hard way.
Combine Filling Ingredients: Transfer the thickened cherry juices to a large bowl with the cherries. Stir in the cinnamon, ginger, almond extract, and a pinch of salt. Give it a good mix until everything is evenly distributed.
Cool the Filling: Allow the filling to cool completely. This is crucial! Adding a warm filling to your pie crust will melt the butter and ruin those beautiful flaky layers. Patience, my friend, patience!
Roll Out the Pie Crust: On a lightly floured surface, roll out one disk of pie dough to a 12-inch circle. Gently transfer the dough to a 9-inch pie plate and trim any excess dough, leaving about a 1-inch overhang. Crimp the edges of the crust to create a pretty border. Place the crust in the refrigerator to chill for 30 minutes.
Preheat the Oven: Place a baking sheet on the bottom rack of your oven (this will help the bottom crust get nice and golden brown). Preheat the oven to 425°F.
Assemble the Pie: Pour the cooled cherry filling into the chilled pie crust.
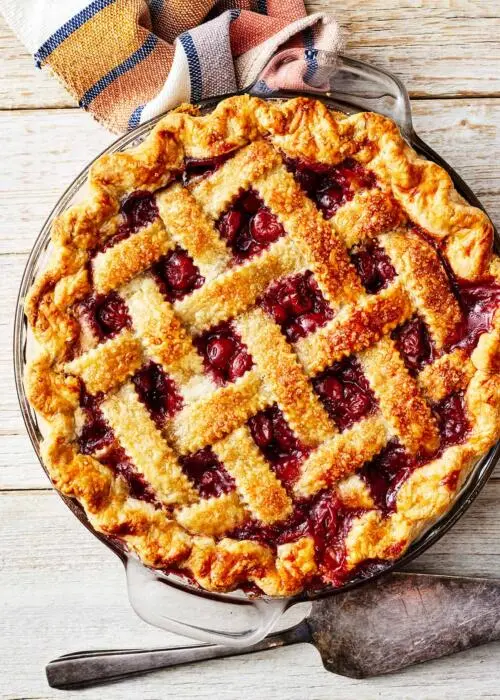
Create a Lattice Top (Optional, but Gorgeous!): Roll out the second disk of pie dough and cut it into 1-inch strips. Arrange half of the strips across the pie, then weave the remaining strips in the opposite direction to create a lattice pattern.
Trim and Crimp the Edges: Trim the edges of the lattice, then fold the edge of the bottom crust up and over it, so the edge of the dough lines up with the edge of your pie plate. Crimp the edges with your fingers or a fork to seal.
Apply the Egg Wash and Sugar: Brush the lattice top with the egg wash (this will give it a beautiful golden shine) and sprinkle with coarse sugar.
Bake the Pie: Place the pie on the preheated baking sheet in the oven. Bake for 20 minutes, then reduce the heat to 375°F and bake for another 30-35 minutes, or until the crust is golden brown and the filling is bubbling.
Watch Carefully: If the crust starts to get too brown, tent it loosely with foil to prevent burning.
Cool Completely: This is the hardest part, I know! Let the pie cool completely on a wire rack (about 4 hours) before slicing and serving. This allows the filling to set and prevents a messy, runny pie.
Serve and Enjoy!: Serve slices of warm or cooled cherry pie with a scoop of vanilla ice cream. Whipped cream is also a delicious addition!
Tips & Tricks
Want to take your cherry pie game to the next level? Here are some of my tried-and-true tips and tricks:
Keep Your Dough Cold: Cold dough is key to a flaky crust. If your dough gets too warm while you’re working with it, pop it back in the fridge for a few minutes to firm up.
Don’t Overmix the Filling: Overmixing can cause the filling to become gummy. Gently stir until everything is just combined.
Use a Pie Shield: If you don’t have foil, a pie shield is a great way to prevent the crust from browning too quickly.
Blind Bake for a Super-Crisp Bottom Crust: For an extra-crisp bottom crust, you can blind bake it before adding the filling. Simply prick the bottom of the crust with a fork, line it with parchment paper, fill it with pie weights or dried beans, and bake at 375°F for 15 minutes. Remove the parchment paper and weights and bake for another 5-10 minutes, or until the crust is lightly golden.
Dietary Variations
Need to make this pie gluten-free or vegan? Here’s how:
Gluten-Free: Use a gluten-free pie crust recipe or store-bought gluten-free pie crust.
Vegan: Use a vegan pie crust recipe (many store-bought crusts are already vegan!). Substitute the egg wash with plant-based milk or a mixture of maple syrup and water. Make sure your coarse sugar is vegan-friendly, as some brands may be processed with bone char.
Frequently Asked Questions
Can I use sweet cherries instead of tart cherries?
You sure can! Keep in mind that sweet cherries will make the pie taste sweeter, so you may want to reduce the amount of sugar in the filling. I recommend starting with 1/2 cup of sugar and adjusting to taste.
Can I make this pie ahead of time?
Absolutely! This pie is perfect for making ahead. You can bake the pie a day or two in advance and store it at room temperature, covered. Or, you can freeze the unbaked pie for up to 3 months. When you’re ready to bake, simply thaw it overnight in the refrigerator and bake as directed.
You May Also Like
If you’re craving more sweet goodness, why not try my light and delicious Protein-Packed Egg Salad for a delightful change of pace? It’s the perfect snack to tide you over until pie time!
And if you’re in the mood for something savory, my Savory Sausage Pepper Pasta is always a hit with the family. It’s quick, easy, and packed with flavor!