Okay, mamas, gather ’round! Let’s talk about the one brunch dish that will officially make you the coolest mom on the block: Chilaquiles Verdes! I know, I know, pancakes and waffles are cute, but sometimes a girl needs something with a little ZING! This recipe is inspired by my years in Austin, where spicy, vibrant breakfasts are practically a religion. It’s my go-to when I’m craving something that kicks things up a notch, plus it’s seriously easy (even with a toddler hanging on your leg!). Get ready for crispy, saucy, utterly addictive goodness. It’s a guaranteed family favorite, or at least it buys you 15 minutes of peace while they devour it!
Why You’ll Love These
Seriously, these chilaquiles are about to become your new best friend. Here’s why:
Quick & Easy: From pantry to table in just 20 minutes! Perfect for busy weeknights or lazy weekend brunches.
Customizable: Add your favorite toppings and make it your own. The possibilities are endless!
Budget-Friendly: Uses simple, affordable ingredients that you probably already have on hand.
Crowd-Pleaser: Everyone loves crispy tortilla chips smothered in zesty salsa. It’s a guaranteed win!
Seriously Delicious: The combination of textures and flavors is out of this world. You won’t be able to stop eating them!
Make the Salsa Verde: If you’re going the extra mile and making homemade salsa verde, do that first. It’s super easy – just roast your tomatillos, onions, garlic, and jalapeños until they’re nice and soft, then blend them up with lime juice, cilantro, and salt. You can even make it a few days ahead of time to save time!
Simmer the Salsa: In a large skillet, combine the salsa verde and water (or vegetable broth). Bring the mixture to a gentle simmer over medium heat. Let it cook for about 5 to 10 minutes, or until the sauce has thickened slightly. This step helps the flavors meld together and creates a richer, more flavorful base for your chilaquiles.
Note: Keep a close eye on the salsa to prevent it from splattering. A simmering lid can be helpful!
Add the Tortilla Chips: Now for the fun part! Add the tortilla chips to the skillet and gently fold them into the salsa until they are evenly coated. Be careful not to over-stir, as you want the chips to retain some of their crispness.
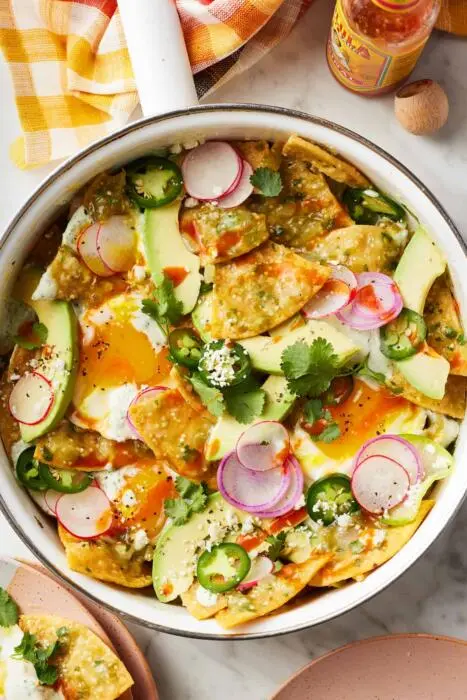
Top It Off: Quickly remove the skillet from the heat and load up those saucy chips with your favorite toppings! We’re talking perfectly fried eggs (runny yolks are a MUST!), generous drizzles of cilantro lime crema, crumbles of salty Cotija cheese, creamy slices of avocado, and a sprinkle of fresh cilantro. Don’t forget those sliced radishes and jalapeños for extra crunch and heat!
Season and Serve: Season the chilaquiles with sea salt and freshly ground black pepper to taste. Serve immediately and prepare for your family to sing your praises!
Tips & Tricks
Want to take your chilaquiles game to the next level? Here are a few of my favorite tips and tricks:
Spice It Up: If you like things extra spicy, add a pinch of cayenne pepper to the salsa verde or use a spicier jalapeño.
Crispy Chips are Key: Wait to add the chips to the salsa until just before serving to prevent them from getting soggy. I even recommend cooking your eggs before you add the chips to the sauce so that they have as little time to soften as possible.
Make Ahead: You can make the salsa verde and cilantro lime crema up to 3 days in advance. Store them in separate airtight containers in the refrigerator.
Flavor Boost: For an extra layer of flavor, sauté some diced onion and garlic in the skillet before adding the salsa.
Dietary Variations
Need to adjust the recipe to fit your dietary needs? No problem!
Vegan: Skip the eggs and Cotija cheese. Use a plant-based crema or avocado crema instead of the cilantro lime crema.
Gluten-Free: Make sure to use gluten-free tortilla chips. Most corn tortilla chips are naturally gluten-free, but it’s always a good idea to double-check the label.
Frequently Asked Questions
Can I use red salsa instead of green salsa?
Absolutely! If you prefer red salsa, go for it! Just swap out the tomatillo salsa for your favorite tomato salsa or red chile sauce. My salsa roja would be delicious!
Can I add meat to these chilaquiles?
Definitely! Shredded chicken, beef, or pork would be a great addition. Simply add the cooked meat to the skillet along with the tortilla chips.
Summary & Final Thoughts
So there you have it: Skillet Chilaquiles Verdes, the brunch dish that will make you a weekend warrior! Serve these up with a side of black beans or refried beans for a complete and satisfying meal. I remember the first time I made these for my family – they were gone in minutes! Now it’s a regular in our rotation, especially when we need a little spice in our lives. Pin this recipe for later, and get ready to impress everyone with your new brunch skills!
You May Also Like
If you’re craving something a little different but still want that comfort food vibe, try my Creamy Chicken Pot Pie Soup. It’s like a warm hug in a bowl!
Or, for a quick and healthy lunch option, you can’t go wrong with my Protein-Packed Egg Salad. It’s light, delicious, and perfect for meal prepping!