SAVE SAVED 0
Prep time: 30 minutes | Cook time: 30 minutes | Cost estimate: $8–12 | Serves: 20
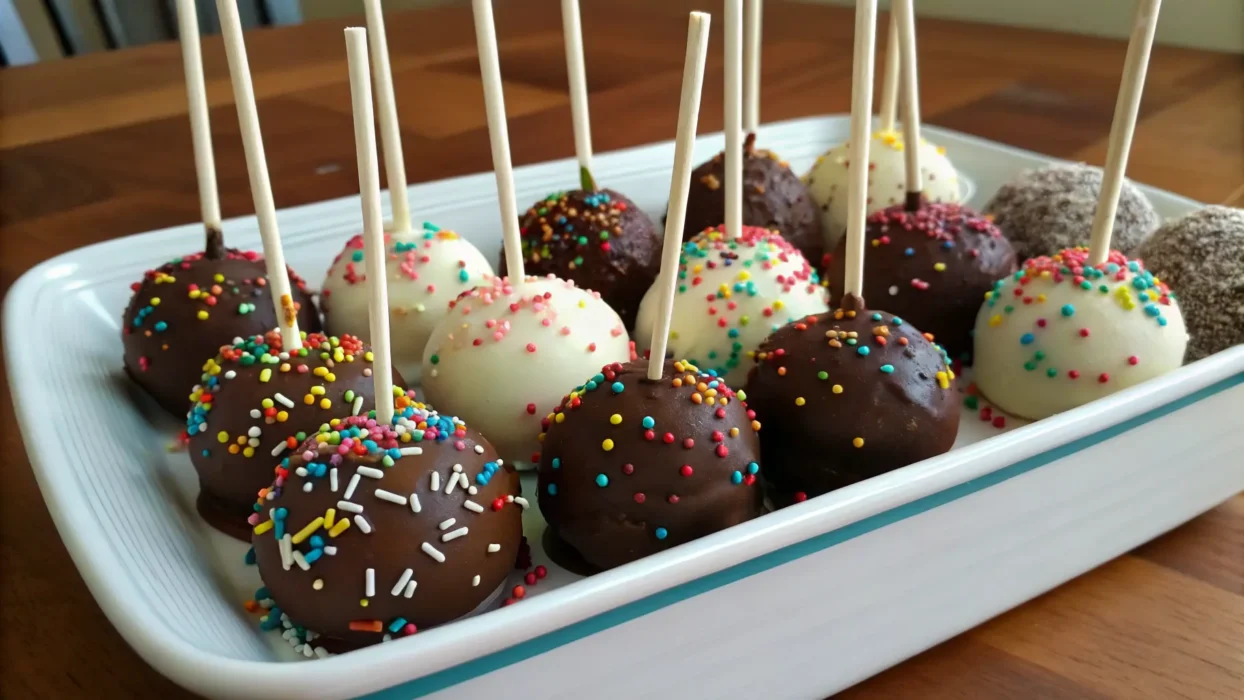
Alright, mama, let’s talk cake pops! These little bites of sugary bliss are perfect for everything from school bake sales to fancy-schmancy birthday parties. And listen, I know what you’re thinking: “Another Pinterest fail waiting to happen?” Nope! This recipe is so simple, even my toddler can “help” (read: make a delightful mess). Get ready to roll up your sleeves and create cake pops that are seriously addictive. I promise, they’ll be gone before you can say, “Who ate all the sprinkles?!” Let’s turn your kitchen into a cake pop factory of fun!
Trust me, these aren’t your average, dry-as-dust cake pops. Here’s why you’ll be obsessed:
Grab these simple ingredients and let’s get this cake pop party started!
Ready to turn that cake into adorable pops of deliciousness? Follow these super-easy steps:
Bake your 9×13-inch cake. You can use a store-bought mix or a homemade recipe. Vanilla, chocolate, or white cake are fantastic options. Let the cake cool completely. A warm cake will make the dough too soggy. Trust me, patience is key here!
Break the cooled cake into fine crumbs in a large mixing bowl. You can do this by hand (therapeutic, right?) or with a stand mixer if you’re feeling fancy. Make sure to remove any hard edges or crusts for the softest, most delectable cake pops.
Add ¼ cup of frosting to the cake crumbs and mix well. Gradually add more frosting, up to ½ cup, until the mixture holds together like dough. Be careful not to add too much frosting, or your cake pops will be too soft and won’t hold their shape. Nobody wants a cake pop puddle!
Tip: Roll a small ball to test the texture. If it holds its shape without cracking, you’re good to go!
Use a cookie scoop or spoon to portion the dough. Roll each portion into a 1-inch ball and place on a parchment-lined baking tray. Uniform sizes are important here, folks, for even dipping later. Now, chill the balls in the refrigerator for 1–2 hours or the freezer for 15–20 minutes to firm them up. This step is crucial—don’t skip it!
In a microwave-safe bowl, melt 16 ounces of candy melts in 30-second intervals, stirring between each. Add 1–2 tablespoons of vegetable oil if the coating is too thick. The melted chocolate should be smooth and pourable for easy dipping. Don’t overheat the candy melts! Burnt chocolate is a sad, sad thing.
Push a lollipop stick halfway into each cooled cake ball. Pro tip: Dip the tip of the stick in melted candy coating first. This acts like “glue” and helps the stick stay put. Now, fully dip each ball into the candy melts, gently tapping off any excess coating. Work quickly but carefully to avoid crumbling. It’s a delicate dance, but you can do it!
While the coating is still wet, add your sprinkles or other decorations. Go wild! Place the cake pop upright in a styrofoam block or cardboard box to let the chocolate set. This takes about 30–60 minutes at room temperature. Avoid refrigerating during this step, as it can cause condensation and ruin the finish. Nobody wants sad, sweaty cake pops.
Want to take your cake pops from “meh” to “magnificent”? These tips are your secret weapon:
Got dietary restrictions? No problem! Here are some easy tweaks:
Ah, the dreaded cake pop slippage! This usually happens if the stick isn’t secured properly. Always dip the stick in candy coating before inserting it into the cake ball. Chilling the balls also helps them grip the stick better. Think of it as giving them a tiny, chocolatey anchor!
Lumpy candy coating is usually too thick. Thin it out with a bit of vegetable oil and stir, stir, stir! Also, make sure the coating isn’t too hot; overheating can cause uneven textures. We’re going for smooth and silky, not chunky monkey!
If your cake pops are crumbling during dipping, the dough is probably too wet or not chilled enough. Use less frosting (start with that ¼ cup I mentioned earlier) and chill the balls for at least an hour. A firm dough is a happy dough.
There you have it, my friends! Your guide to making cake pops that are guaranteed to impress (and disappear quickly). Serve these at your next party, gift them to your kid’s teacher, or just enjoy them as a sweet treat after a long day. I still remember the first time I made these with my daughter – sprinkles EVERYWHERE, but the smiles were even bigger! This is a recipe to bookmark, pin, and share with all your fellow busy mamas. Happy baking!