SAVE SAVED 0
The Tomahawk steak. It’s more than just a meal; it’s an experience. With its impressive bone and generous marbling, it’s the ultimate showstopper. This isn’t your average steak, so don’t treat it as such. The key to unlocking its full potential? The reverse sear. This method, starting in the oven and finishing on a scorching grill, guarantees a juicy interior and a magnificent crust every single tim
A Tomahawk steak is an investment. Don’t let fear of messing it up keep you from enjoying it at home. Its sheer size and thickness present a unique challenge, making traditional cooking methods like pan-searing or solely grilling risky propositions. You risk uneven cooking, overcooked edges, and a disappointing result.
The reverse sear method eliminates these risks. By starting the cooking process in a low oven, the steak cooks gently and evenly from edge to edge. This gentle approach minimizes the overcooked band that often plagues thick cuts. Then, a brief but intense sear on the grill creates a beautiful, flavorful crust that seals in all the juicy goodness. The result is a steak that’s perfectly cooked, incredibly tender, and bursting with flavor.
Pioneered by culinary experts like J. Kenji Lopez-Alt, this technique is more than just a trend. It’s a scientifically sound approach to cooking thick steaks, ensuring maximum juiciness and an unparalleled crust. Once you try it, you’ll never go back!

The Tomahawk steak, with its dramatically long rib bone, is guaranteed to turn heads. While essentially a ribeye (also known as a Scotch fillet in some regions) with an extended bone, it’s an experience unto itself. Some might argue you’re paying for the inedible bone, but the “wow” factor is undeniable.
Imagine the anticipation as it sizzles, the aroma filling the air. The oohs and aahs as it’s presented, a testament to its magnificence. But the Tomahawk is more than just a pretty face. Ribeye is renowned for its rich marbling, resulting in a succulent, flavorful cut that practically melts in your mouth. It’s the king of steaks for a reason!
Ordering this showstopper at a steakhouse can easily set you back a hefty sum. Save your money and impress your guests by mastering the art of cooking it at home. Let’s embark on this culinary adventure and unlock the secrets to Tomahawk perfection!

Here’s a close-up of the star of the show: a Tomahawk steak, fresh from the butcher. The one pictured weighs approximately 2.6 lbs (1.3kg) and boasts a thickness of 2 inches (5cm) at its thickest point. Surprisingly, you only need a few simple ingredients to transform it into a culinary masterpiece: oil, salt, and pepper.

It’s true: Tomahawk steaks are among the rare cuts that look just as impressive raw as they do cooked. Let’s dive into the details – what exactly *is* a tomahawk, what makes it so special, where can you find one, and what size should you look for? All of this valuable information is available in the expandable section below. Get ready to learn!
As mentioned earlier, we’re employing the reverse sear method, starting in the oven and finishing on the grill. Don’t have a grill? No problem! You can use your oven’s broiler (grill) – instructions are included in the recipe card.
For foolproof results, please use a meat thermometer to ensure your steak reaches the desired doneness. This is not the time to rely on guesswork.

Bring to Room Temperature – If time allows, take the steak out of the refrigerator about 1 hour before cooking. While it’s not crucial, it helps the steak cook more evenly.
Remove the tomahawk from its packaging and pat it thoroughly dry with paper towels.
⚠️ Resist the urge to salt the steak ahead of time. Salt draws moisture to the surface, hindering the development of a beautiful crust during searing.
Season Generously – Just before cooking, generously sprinkle the meat surfaces with salt and freshly ground black pepper. Use your hands to rub the seasoning in, ensuring it adheres well. Focus the seasoning on the meat itself, adding only a touch to the bone if it has meat on it (refer to the FAQ in the Ingredients section regarding cleaning the bone).
During this stage, we’re gently roasting the steak in the oven to ensure even cooking throughout. A too-hot oven can result in a thick, overcooked outer layer.

Slow(ish) Roast – Place the steak on a wire rack set inside a baking sheet. Roast for 40 to 45 minutes in a moderately low oven at 285°F (140°C), or 250°F (120°C) if you have a fan-forced oven, until the internal temperature reaches 122°F (50°C). This is the target temperature for medium-rare, the ideal doneness for steaks. (See the box below for temperature guidelines for other levels of doneness.)
???? Why use a wire rack? It elevates the steak, preventing the underside from becoming soggy and hindering the crust formation during searing.
Rest for 10 Minutes – Remove the baking sheet from the oven and let the steak rest on the counter for 10 minutes. During this time, the internal temperature will rise by about 5°F (3°C), reaching approximately 127°F (53°C). At this stage, the steak will lack color. We’ll address that in the next step!
⚠️ Never skip resting! Resting is vital for juicy steak. It allows the juices to redistribute throughout the meat fibers, ensuring they end up in your mouth rather than leaking out onto the plate when you slice the steak.
Now, it’s time for the grand finale: searing the steak on the grill to achieve that irresistible crust and smoky, charred flavor. Unfortunately, a Tomahawk steak is generally too large to sear in a regular pan on the stovetop.
No Grill? Don’t worry! See the instructions below for cooking a tomahawk steak using your oven’s broiler (grill).

Sear the Sides – Lightly oil both sides of the steak. Preheat your grill until it’s screaming hot. If using the grill grates, reduce the heat to low (if your grill is very powerful) or medium-low (if it’s less powerful). This will help you control flare-ups caused by the tomahawk’s fat. If you’re using a flat griddle, reduce the heat to medium.
Start by searing the edges of the steak and any meat on the bone (skip this step if the bone is completely cleaned). Use tongs to stand the steak upright and rotate it, searing all sides.
Sear for 6 to 8 Minutes – Sear the steak for 3 to 4 minutes per side, until it develops a deep, dark brown crust and the internal temperature reaches 131°F (55°C). Adjust the heat as needed. If the tomahawk steak has been resting for a while and has cooled down significantly, it may take a bit longer to reach the target temperature.
⚠️ Flare-ups – If searing over open grates, stay vigilant! Flare-ups are inevitable. Shift the steak around or briefly remove it from the heat to avoid scorching. The goal is a beautiful char, not a burnt crust! If flare-ups become too difficult to manage, switch to the flat griddle.

Rest – Let the steak rest on a wire rack for 3 minutes (I simply reuse the rack it was roasted on). The internal temperature will rise to around 135°F (57°C), which is perfect medium-rare.
???? Don’t Panic if the temperature is slightly higher. Tomahawk steaks are incredibly juicy, so even at 140°F (60°C), which is medium, it will still taste similar to medium-rare.
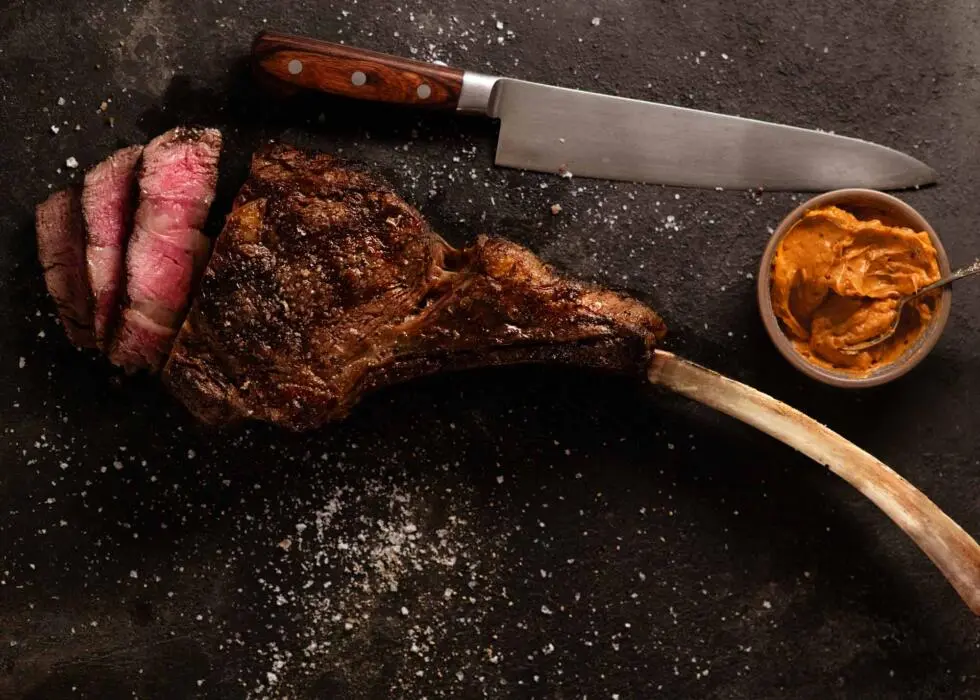
Slice and Serve – Cut the steak into slices about 0.4 inches (1 cm) thick. Serve immediately with your favorite steak sauce.