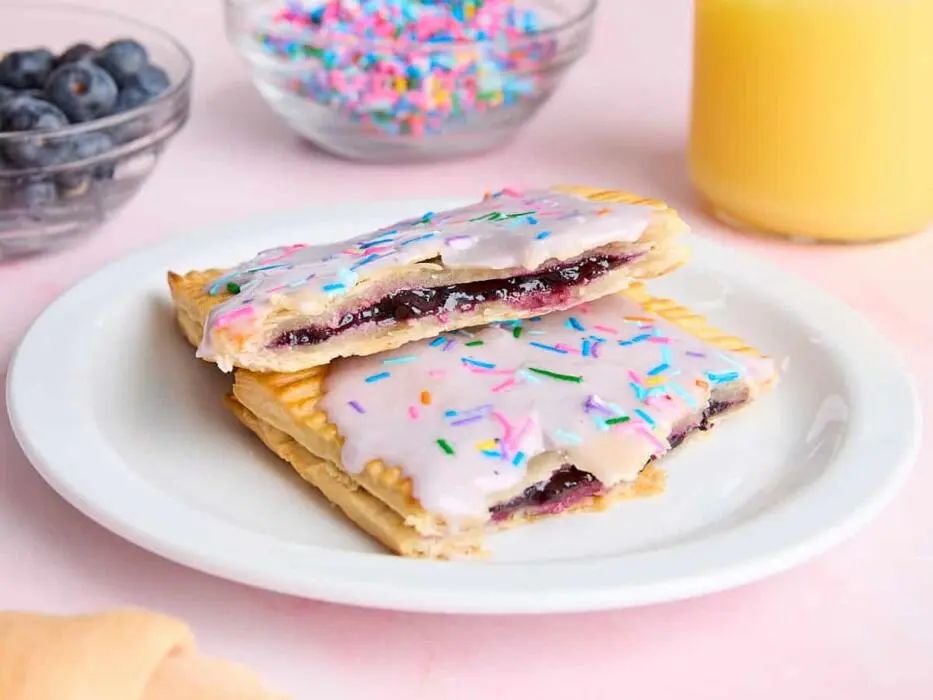
Forget the store-bought version! These Homemade Pop Tarts are a delightful trip down memory lane, boasting a flaky, buttery crust and a sweet, fruity filling, all topped with a simple, yet satisfying glaze. Get ready to create warm, comforting treats that are far superior to anything you can find on a grocery store shelf.
The Magic of Homemade Pop Tarts
There’s something undeniably charming about a warm, homemade Pop Tart. The aroma of baking pastry, the anticipation of the first bite, the sweet, gooey filling – it’s a simple pleasure that evokes feelings of warmth and happiness. This recipe guides you through each step, ensuring even novice bakers can achieve Pop Tart perfection. We’ll cover everything from creating the perfect flaky crust to selecting the best filling combinations. Get ready to experience the joy of truly homemade goodness!
Why Make Pop Tarts From Scratch?
While convenient, pre-made Pop Tarts often contain preservatives and artificial ingredients. Making them from scratch allows you to control the quality of ingredients, customize the flavors to your liking, and experience the satisfaction of creating a truly homemade treat. The difference in taste and texture is remarkable – a testament to the power of real, fresh ingredients.
Ingredients for Pop Tart Perfection
- For the Crust:
- 2 ½ cups (300g) all-purpose flour, plus more for dusting
- 1 teaspoon (5g) granulated sugar
- ½ teaspoon (3g) salt
- 1 cup (227g) cold unsalted butter, cut into ½-inch cubes
- 6-8 tablespoons (90-120ml) ice water
- 1 large egg, beaten (for egg wash)
- For the Filling (Strawberry):
- 1 cup (240g) strawberry jam, high-quality
- 1 tablespoon (8g) cornstarch
- 1 teaspoon (5ml) lemon juice
- For the Glaze:
- 1 cup (120g) powdered sugar
- 2-3 tablespoons (30-45ml) milk
- Optional: Sprinkles for decoration
Step-by-Step Instructions: Baking Your Pop Tarts
- Prepare the Dough: In a large bowl, whisk together the flour, sugar, and salt. Tip: Make sure all dry ingredients are evenly distributed.
- Cut in the Butter: Add the cold, cubed butter to the dry ingredients. Using a pastry blender or your fingertips, cut the butter into the flour mixture until it resembles coarse crumbs. Important: Work quickly to prevent the butter from melting. You want small pieces of butter to remain intact for a flaky crust.
- Add Ice Water: Gradually add the ice water, 1 tablespoon at a time, mixing gently after each addition, until the dough just comes together. Note: Be careful not to overmix. Overmixing develops the gluten and results in a tough crust.
- Form the Dough: Divide the dough in half. Flatten each half into a disc, wrap in plastic wrap, and refrigerate for at least 30 minutes. Pro Tip: Chilling the dough allows the gluten to relax, making it easier to roll out.
- Prepare the Filling: In a small bowl, whisk together the strawberry jam, cornstarch, and lemon juice until smooth. Flavor Boost: For a richer flavor, consider adding a pinch of cinnamon or nutmeg to the filling.
- Roll Out the Dough: On a lightly floured surface, roll out one disc of dough into a rectangle about 1/8 inch thick. Use a sharp knife or pastry wheel to cut out even rectangles (approximately 3×4 inches). Tip: Use a ruler for precision!
- Add the Filling: Place about 1 tablespoon of strawberry filling in the center of half of the dough rectangles, leaving a small border around the edges. Avoid Overfilling: Too much filling will cause the Pop Tarts to leak during baking.
- Top with Dough: Brush the edges of the filled rectangles with the beaten egg. Carefully place the remaining dough rectangles on top, pressing down the edges with a fork to seal. Sealing is Key: Ensure a tight seal to prevent the filling from escaping.
- Egg Wash and Vent: Brush the tops of the Pop Tarts with the remaining egg wash. Use a knife or fork to poke a few small slits in the tops of each Pop Tart to allow steam to escape. Safety First: These vents are essential for preventing the Pop Tarts from bursting.
- Bake: Preheat your oven to 375°F (190°C). Place the Pop Tarts on a baking sheet lined with parchment paper. Bake for 18-20 minutes, or until golden brown. Oven Temperatures Vary: Keep a close eye on the Pop Tarts during baking and adjust the time as needed.
- Cool: Let the Pop Tarts cool on a wire rack completely before frosting. Patience is a Virtue: Frosting warm Pop Tarts will cause the glaze to melt.
- Prepare the Glaze: In a small bowl, whisk together the powdered sugar and milk until smooth. Add more milk, 1 teaspoon at a time, until the glaze reaches your desired consistency. Consistency Matters: The glaze should be thick enough to coat the Pop Tarts but thin enough to spread easily.
- Frost and Decorate: Spread the glaze over the cooled Pop Tarts. Immediately sprinkle with sprinkles, if desired. Get Creative: Experiment with different colors and types of sprinkles!
Cooking Tips and Tricks for Perfect Pop Tarts
- Keep it Cold: The key to a flaky crust is keeping the ingredients cold. Use ice water and cold butter, and work quickly to prevent the butter from melting.
- Don’t Overmix: Overmixing the dough develops the gluten, resulting in a tough crust. Mix only until the dough just comes together.
- Chill Out: Chilling the dough allows the gluten to relax and the butter to firm up, making it easier to roll out and resulting in a flakier crust.
- Seal the Deal: Ensure a tight seal around the edges of the Pop Tarts to prevent the filling from escaping during baking.
- Venting is Vital: Don’t skip the step of poking holes in the tops of the Pop Tarts. These vents allow steam to escape, preventing the Pop Tarts from bursting.
Flavor Pairings and Variations
The beauty of homemade Pop Tarts is the endless possibilities for customization. Here are a few ideas to inspire your creativity:
- Brown Sugar Cinnamon: Use brown sugar and cinnamon in the filling for a warm, comforting flavor. A cream cheese glaze would complement this perfectly.
- Chocolate Hazelnut: Fill with Nutella or a homemade chocolate hazelnut spread. Top with a chocolate glaze and chopped hazelnuts.
- Blueberry: Use blueberry jam or a homemade blueberry filling. Add a hint of lemon zest for a brighter flavor.
- Apple Cinnamon: Sauté diced apples with cinnamon, sugar, and a touch of butter for a delicious autumn-inspired filling.
- Peanut Butter and Jelly: A classic combination! Use your favorite peanut butter and jelly for a nostalgic treat.
- Savory Pop Tarts: For a savory twist, try fillings like spinach and ricotta, ham and cheese, or pizza toppings.
Make-Ahead Advice and Storage
These Pop Tarts are best enjoyed fresh, but they can be stored in an airtight container at room temperature for up to 2 days. For longer storage, freeze the unglazed Pop Tarts. To reheat, bake in a preheated oven at 350°F (175°C) for 5-7 minutes, or until warmed through. Alternatively, you can toast them gently.
You can also prepare the dough ahead of time. The dough can be stored in the refrigerator for up to 2 days or frozen for up to 2 months. Thaw the dough in the refrigerator overnight before using.
Regional Alternatives
Pop Tarts, in their essence, are hand pies. Many cultures have their own versions of filled pastries. Think of Argentinian empanadas (though savory), or Italian ravioli dolci (sweet ravioli). The concept of a sealed dough pocket filled with a sweet or savory treat is universally loved.
Dietary Substitutions
- Vegan: Substitute the butter with a vegan butter alternative. Use plant-based milk for the glaze and ensure your jam is vegan-friendly. You can also use a flax egg (1 tablespoon ground flaxseed mixed with 3 tablespoons water) as an egg wash substitute.
- Gluten-Free: Use a gluten-free all-purpose flour blend for the crust. You may need to add a binding agent like xanthan gum to help hold the dough together.
- Lower Sugar: Use a sugar-free jam and a sugar substitute like erythritol or stevia in the glaze.
Prep Time: 30 minutes
Cook Time: 20 minutes
Servings: 6-8 Pop Tarts
The Sweet Conclusion: Homemade Pop Tart Bliss
Crafting your own Homemade Pop Tarts is more than just baking; it’s about creating a memorable experience. From the flaky crust to the sweet, customizable fillings, each bite is a testament to the joy of homemade goodness. Ditch the store-bought version and embrace the delightful flavors and textures of these nostalgic treats. You and your loved ones will savor every moment!
Frequently Asked Questions (FAQ)
- Q: Why is my Pop Tart crust tough?A: A tough crust is usually caused by overmixing the dough. Overmixing develops the gluten, which leads to a tough texture. Be sure to mix the dough only until it just comes together, and avoid kneading it.
- Q: How do I prevent the filling from leaking out?A: Ensure a tight seal around the edges of the Pop Tarts by pressing down firmly with a fork. Also, avoid overfilling the Pop Tarts. Too much filling will cause them to leak during baking. Finally, don’t forget to create vents on top so steam can release.